Graduation Cupcakes
Graduation cupcakes turn a simple batch of cupcakes into a celebration centerpiece with edible caps, school colors, and festive decorations. These decorated graduation cupcakes are easy to customize for high school, college, or kindergarten graduations, and they look impressive without requiring advanced cake decorating skills.
Prep
15 min
Cook
N/A
Total
15 min
Servings
12 cupcakes
Ingredients
Tools that make this easier
Optional — the recipe works without them.
As an Amazon Associate, I earn from qualifying purchases.
Instructions
- 1
Prepare the cupcakes. Bake and cool the cupcakes completely. The tops should feel springy when lightly pressed and no longer release warmth when touched.
- 2
Frost each cupcake. Spread or pipe a generous swirl of buttercream onto every cupcake. The frosting should hold its shape with soft ridges rather than appearing runny.
- 3
Create the graduation caps. Attach a chocolate sandwich cookie or square chocolate piece to the top of a mini peanut butter cup using a small amount of melted chocolate. Hold for a few seconds until the pieces stay connected without sliding.
- 4
Make the tassels. Cut thin strips of fondant or pipe a short line of yellow icing onto each cap. Add a small candy pearl or frosting dot where the tassel meets the cap for a finished look.
- 5
Place the caps on the cupcakes. Gently press each graduation cap decoration into the frosting. The cap should sit level without sinking deeply into the buttercream.
- 6
Add school colors. Pipe borders, stars, or rosettes around the graduation cap using colored frosting. Look for clean edges and defined shapes rather than overfilling the cupcake surface.
- 7
Finish with festive details. Sprinkle on edible decorations or add themed toppers. The final cupcakes should have a clear focal point with enough space around the cap design to keep the presentation neat.
Used in this recipe: Small Offset Spatula (Amazon, affiliate links)
Nutrition (per serving)
500 kcal
Calories
5g
Protein
65g
Carbs
20g
Fat
1g
Fiber
300mg
Sodium
Graduation cupcakes turn a batch of plain vanilla cupcakes into party decorations with buttercream, chocolate graduation caps and yellow tassels. The caps are built from mini peanut butter cups and chocolate sandwich cookies, so you need no special tools or advanced decorating skills. The recipe starts from 12 baked and cooled cupcakes and takes about 15 minutes of decorating; it can be adapted to any school colors.
Ingredients
For the Cupcakes
- 12 vanilla cupcakes, baked and cooled
- 1 batch buttercream frosting
- Black food coloring (optional, for graduation cap designs)
A sturdy vanilla cupcake works best because it has to support the toppers. Any reliable vanilla or yellow cupcake recipe will do, and a boxed mix is fine. If you want a fruity base, our pink lemonade cupcakes are a good alternative.
For the Graduation Caps
- 12 mini peanut butter cups or chocolate candies
- 12 chocolate sandwich cookies or square chocolate pieces
- Decorating gel or melted chocolate
- Yellow candy strips, fondant, or icing for tassels
Optional Decorations
- Colored sprinkles matching school colors
- Mini candy pearls
- Graduation-themed cupcake toppers
- Colored frosting for piping borders
- Edible glitter for special occasions
Peanut butter cups are a common allergen at parties. If anyone attending has a nut allergy, use another chocolate candy of similar size and label the cupcakes.
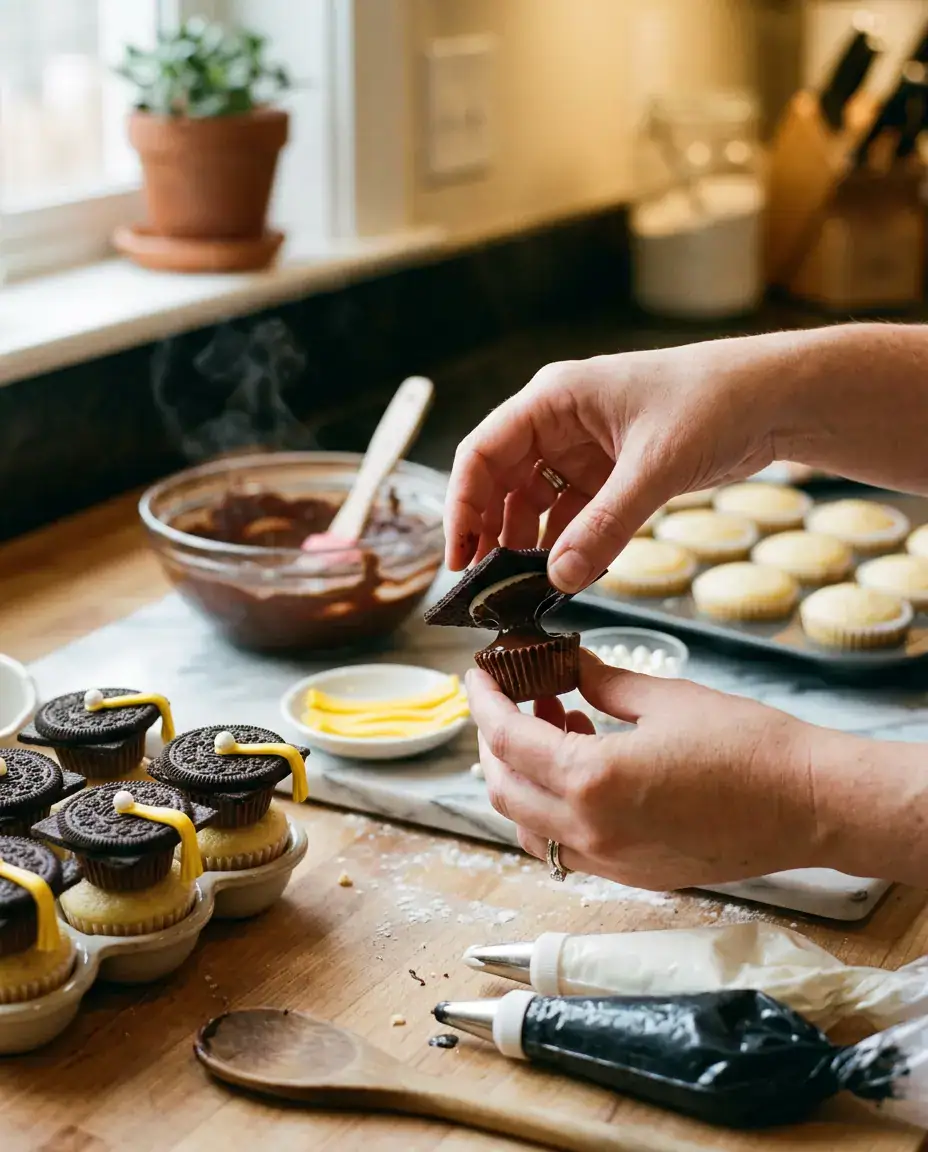
Decorating the Cupcakes Step by Step
- Prepare the cupcakes. Bake and cool the cupcakes completely. Frosting a warm cupcake melts it. The tops should feel springy when lightly pressed and no longer feel warm.
- Frost each cupcake. Spread or pipe a generous swirl of buttercream onto every cupcake. The frosting should hold its shape with soft ridges rather than looking runny.
- Build the graduation caps. Attach a chocolate sandwich cookie or square chocolate piece to the top of a mini peanut butter cup using a small amount of melted chocolate. Hold for a few seconds until the pieces stay connected without sliding.
- Add the tassels. Cut thin strips of fondant or pipe a short line of yellow icing onto each cap. Add a small candy pearl or frosting dot where the tassel meets the cap.
- Place the caps. Gently press each cap into the frosting. It should sit level without sinking deeply into the buttercream.
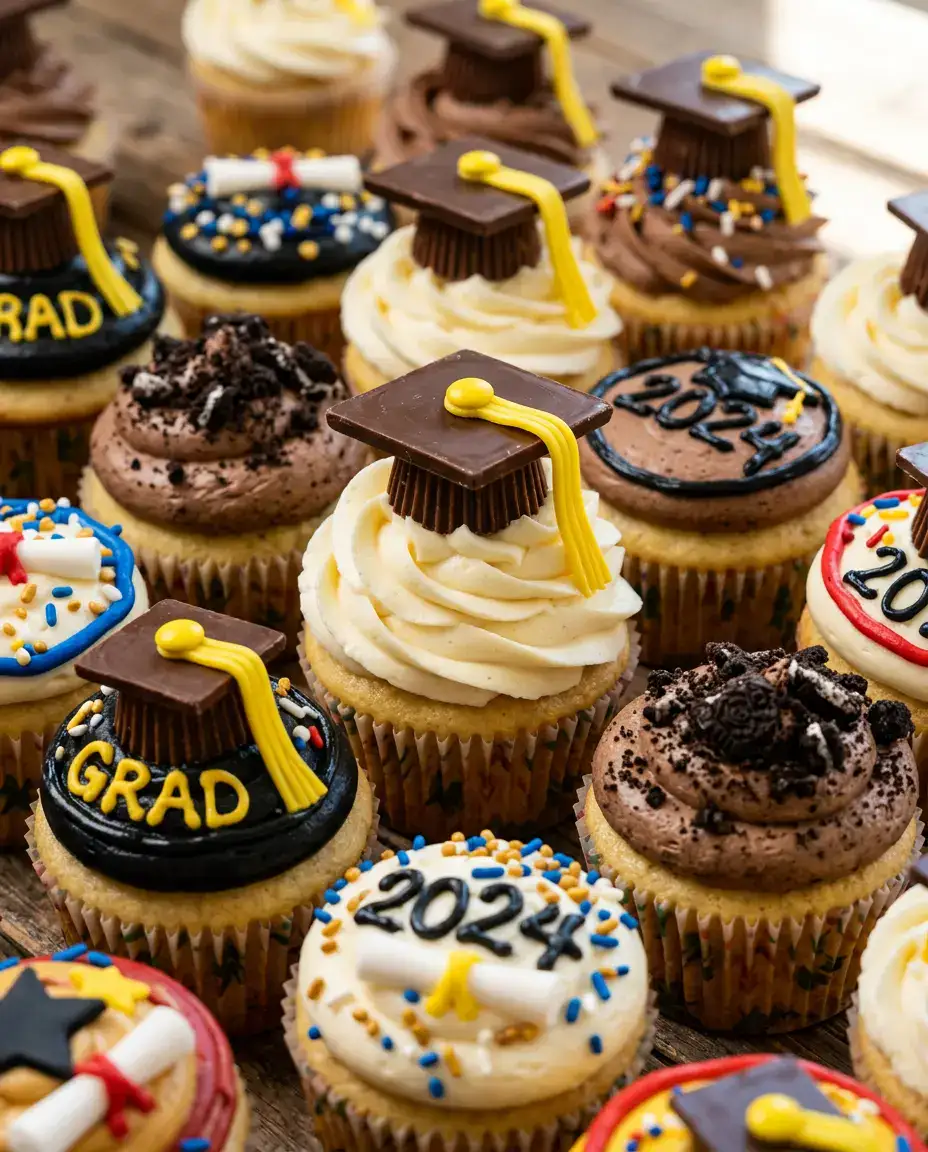
- Add school colors. Pipe borders, stars or rosettes around the cap using colored frosting. Clean edges and defined shapes look better than crowding the top of the cupcake.
- Finish with details. Add sprinkles, edible glitter or themed toppers. Leave enough space around the cap so it stays the focal point.
Why a Cap-Topped Cupcake Works for a Party
Each cupcake is its own small centerpiece, so you avoid decorating a full sheet cake, and guests can pick one up without cutting anything. The cap shape is instantly recognizable, and using chocolate candy and cookies makes a sturdy topper that holds up during transport and serving. You can match school colors, the graduation year or the party theme without changing the cupcake recipe underneath.
Keeping Caps Level and Frosting Sharp
- Toppers falling apart or sliding: The melted chocolate glue has not set. Assemble the caps a few hours ahead and let them rest until the chocolate is firm before placing them on the cupcakes.
- Caps tilt or sink: The frosting is too soft. Chill it briefly before decorating, since firmer frosting supports heavier candy toppers.
- Messy borders: Use a piping bag for borders and school-color accents instead of spreading with a knife.
- Frosting losing its shape: Warm weather softens buttercream. Keep decorated cupcakes in a cool place, and out of direct sun at outdoor parties.
- Different buttercream: Buttercream pipes cleanly and holds toppers well. Very soft or whipped frostings are more likely to let caps tilt.
Candy and Decoration Swaps
- No peanut butter cups: Use any similar-size chocolate candy. Small chocolate truffles, chocolate-covered caramels or stacked chocolate squares make the same cap shape.
- Filled cupcakes: You can fill the cupcakes before frosting for a surprise inside. Use a filling that holds its shape so it does not make the frosting slide.
- Variety tray: Mix graduation cap cupcakes with school-color swirl cupcakes, cupcakes topped with the graduation year and sprinkle-covered ones.
Setting Up a Graduation Dessert Table
Arrange the cupcakes on tiered stands or a dessert table, grouped or alternated by school color. They sit well beside cookies, candy jars and other make-ahead sweets such as strawberry shortcake truffles.
Making Graduation Cupcakes Ahead
- Day before: Bake the cupcakes up to one day ahead and store them covered at room temperature. For the freshest look, frost and add the caps on the day of the party.
- Freezing: Undecorated cupcakes freeze well for up to three months when wrapped properly. Decorate after thawing, because frosting details and candy toppers can lose their look in the freezer.
- Leftovers: Buttercream-frosted cupcakes are fine covered at room temperature for the party, but if your frosting contains cream cheese or whipped cream, keep them refrigerated. Do not leave them out for more than 2 hours.
The card lists about 500 kcal per decorated cupcake.
Graduation Cupcake FAQ
Can I make graduation cupcakes the day before?
Yes. Bake the cupcakes a day ahead and add the frosting and caps the day of the event. Assemble the caps earlier so the chocolate can set.
What frosting works best?
Buttercream is the easiest option because it pipes cleanly and holds toppers. A frosting that is too soft may let the caps tilt or sink.